Table of contents
Task 1:
- Introduction:
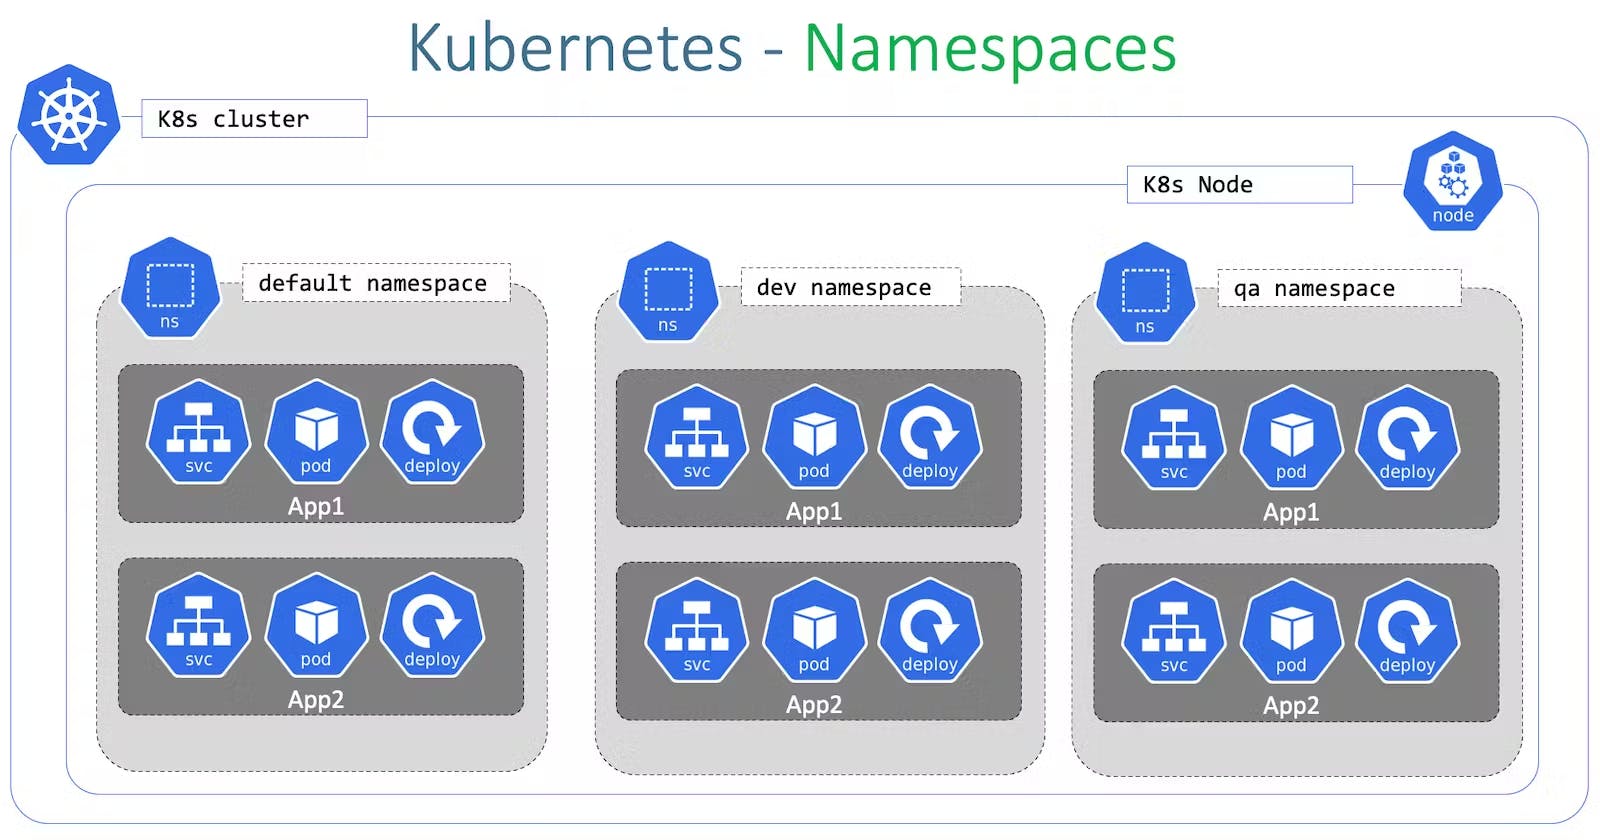
In the world of Kubernetes, Namespaces provide a way to logically divide and isolate resources within a cluster. They offer a level of abstraction that allows teams to manage and organize their deployments more effectively. In this blog post, we will guide you through the process of creating a Namespace for your deployment, updating the deployment configuration to include the Namespace, and verifying the successful creation of the Namespace in your Kubernetes cluster.
Step 1: Creating a Namespace To create a Namespace, follow these steps:
Open your terminal or command prompt and run the following command:
kubectl create namespace <namespace-name>Replace
<namespace-name>with a suitable name for your Namespace. This command creates a new Namespace within your Kubernetes cluster.
Step 2:
Updating the Deployment Configuration Now that we have created the Namespace, we need to update the deployment configuration file to include the Namespace information. Here's how you can do it:
Locate the deployment YAML file (commonly named
deployment.ymlordeployment.yaml) that describes your deployment configuration.Open the deployment YAML file in a text editor of your choice.
Find the
metadatasection in the YAML file, which contains information about the deployment. Within themetadatasection, add the following lines:namespace: <namespace-name>Replace
<namespace-name>with the same name you used when creating the Namespace.Save the changes to the deployment YAML file.
Step 3:
Applying the Updated Deployment To apply the updated deployment configuration with the Namespace information, follow these steps:
Open your terminal or command prompt.
Navigate to the directory where the deployment YAML file is located.
Run the following command to apply the updated deployment:
kubectl apply -f deployment.yml -n <namespace-name>Replace
<namespace-name>with the name of the Namespace you created.This command applies the deployment configuration to the Kubernetes cluster, associating it with the specified Namespace.
Step 4: Verifying the Namespace Creation To verify that the Namespace has been successfully created, follow these steps:
Run the following command to view the list of available Namespaces in your Kubernetes cluster:
kubectl get namespacesThis command displays a list of Namespaces in your cluster, including the one you created. Ensure that the Namespace you created is listed and its status is
Active.
Task 2:
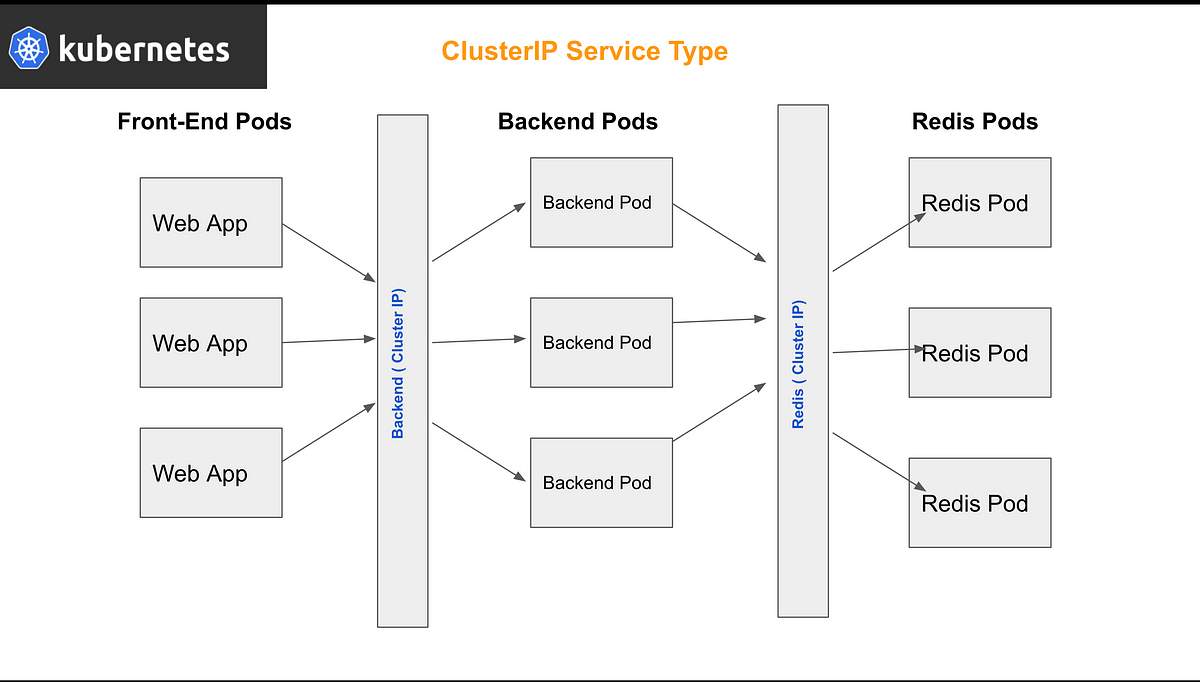
- Understanding Services: In Kubernetes, a Service is an abstract way to expose a set of Pods as a network service. It provides a stable endpoint for other components within or outside the cluster to access the Pods. Services abstract away the underlying infrastructure, allowing the Pods to be easily scaled up or down without affecting accessibility. There are several types of Services in Kubernetes:
ClusterIP: This is the default type and provides a service accessible only within the cluster. It assigns a stable IP address (ClusterIP) to the Service, which acts as a virtual entry point for accessing the Pods.

NodePort: This type exposes the Service on a static port on each node in the cluster. It allows external access to the Service by mapping the NodePort to the ClusterIP.
LoadBalancer: This type integrates with cloud providers' load balancers to distribute traffic across multiple Pods. It automatically creates a load balancer and assigns an external IP address that forwards traffic to the Service.
ExternalName: This type allows creating a Service that redirects requests to a CNAME record specified by the user. It enables accessing external services by mapping them to a Kubernetes Service.
- Load Balancing in Kubernetes: Load balancing is a critical aspect of distributing incoming network traffic across multiple Pods to ensure optimal resource utilization and high availability. Kubernetes employs different load balancing strategies to achieve this:
IPVS (IP Virtual Server): Kubernetes leverages IPVS, a kernel-based load balancer, to perform load balancing at the transport layer (Layer 4). IPVS efficiently distributes traffic based on algorithms like round-robin, least connection, and more.
kube-proxy: Kubernetes incorporates a built-in component called kube-proxy, which runs on each node and manages the network proxy and load balancing rules. It dynamically updates the iptables rules to direct traffic to the appropriate Pods.
Service Discovery: Kubernetes employs DNS-based service discovery to resolve Service names to their corresponding IP addresses. This allows client applications to communicate with Services using their logical names, abstracting away the complexities of IP management.
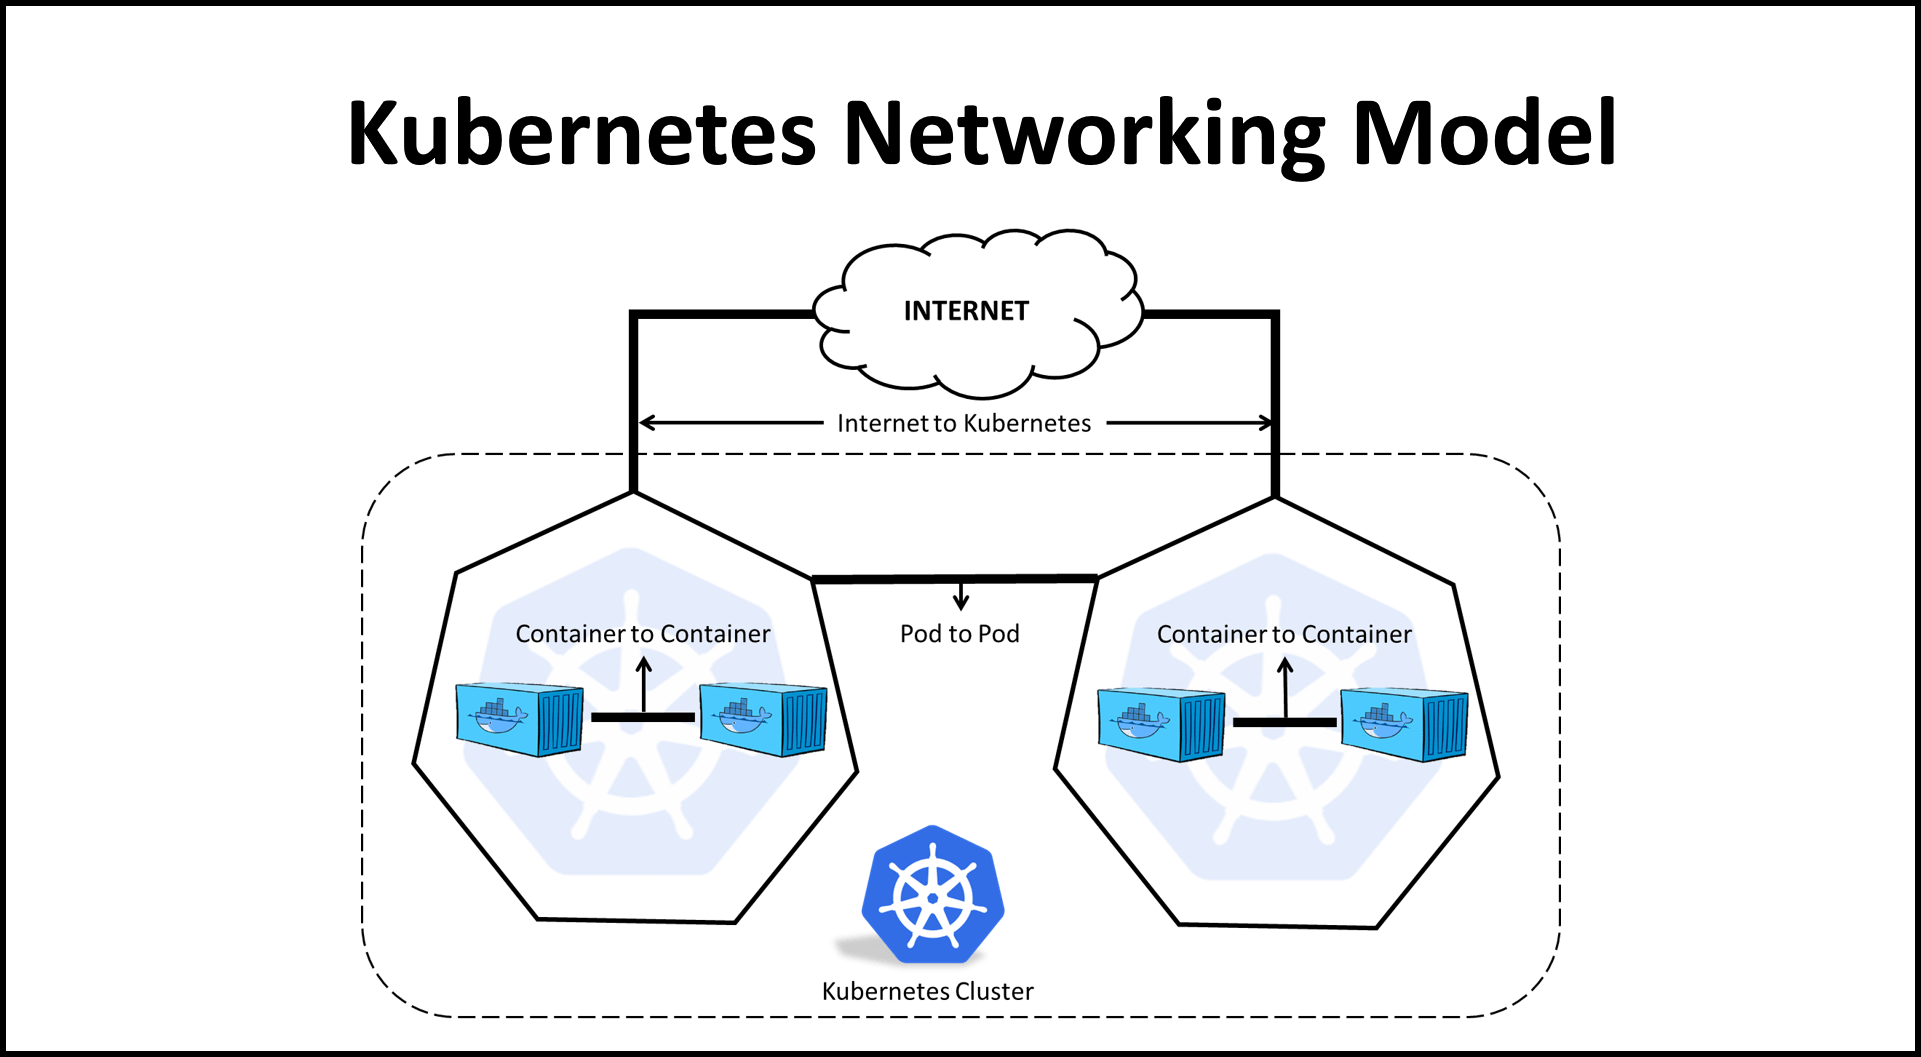
- Networking in Kubernetes: Kubernetes provides a powerful networking model that enables communication between Pods, Services, and external entities. Some key networking concepts include:

Pod Networking: Each Pod in Kubernetes has a unique IP address that enables inter-Pod communication. Pods can communicate with other Pods within the same cluster using their IP addresses or DNS names.
Network Plugins: Kubernetes supports various network plugins that enable Pod networking. Plugins like Calico, Flannel, and Weave provide different networking models, such as overlay networks, to facilitate communication between Pods across different nodes.
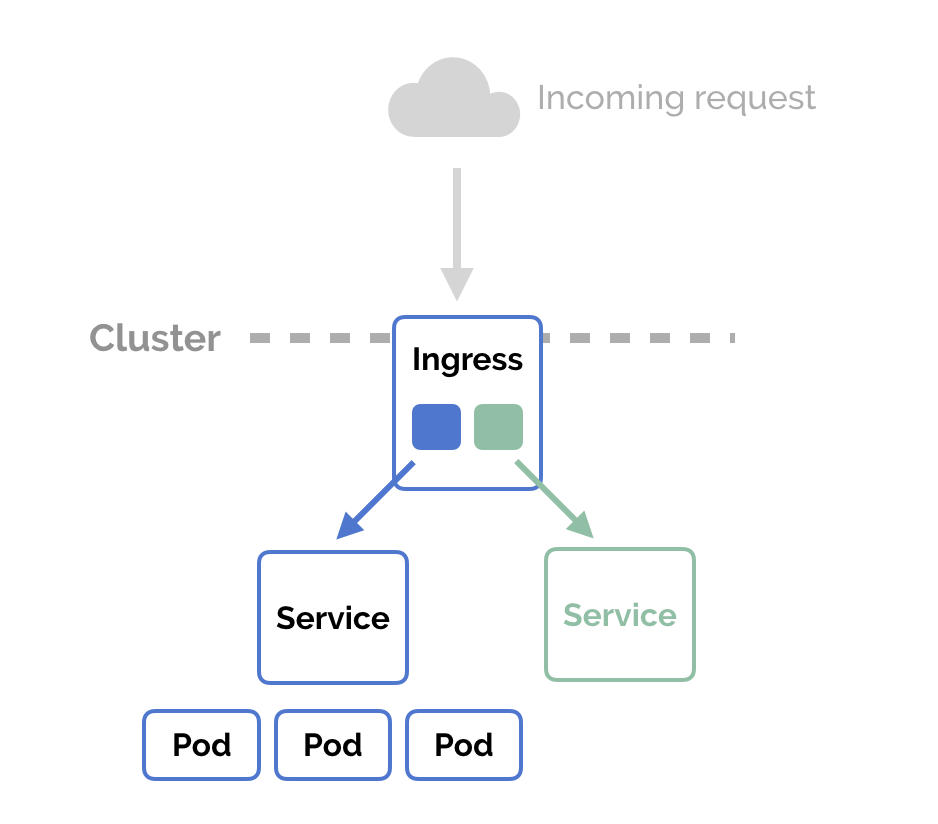
Ingress: Ingress is an API object in Kubernetes that manages external access to Services. It acts as an entry point for routing incoming requests to the appropriate Services based on hostnames, paths, or other rules. Ingress controllers, such as Nginx Ingress Controller or Traefik, handle the actual request routing.

Conclusion:
In this blog post, we have explored the process of creating a Namespace for your Kubernetes deployment. We started by using the kubectl create namespace command to create a Namespace. Then, we updated the deployment configuration YAML file to include the Namespace information. Finally, we applied the updated deployment using the kubectl apply command and verified the successful creation of the Namespace by checking the status of Namespaces in the Kubernetes cluster. Remember to adapt the Namespace creation and deployment update steps to your specific deployment requirements and naming conventions. With these practices in place, you'll be well on your way to effectively managing your Kubernetes deployments using Namespaces.

To connect with me - https://www.linkedin.com/in/subhodey/

