


Table of contents
- Introduction:
- What is AWS CodeCommit?
- Key Features and Benefits:
- Setting Up CodeCommit:
- How does CodeCommit work?
- Task 1: Set up a code repository on CodeCommit and clone it on your local.
- Task 2: Add a new file from local and commit to your local branch. Push the local changes to the CodeCommit repository.
Introduction:
Version control is a critical aspect of software development, enabling teams to collaborate effectively, track changes, and ensure the integrity of their codebase. AWS CodeCommit, a fully managed source control service, offers a secure and scalable solution for hosting private Git repositories. In this blog, we will explore the features of CodeCommit and provide a comprehensive guide on how to use it effectively in your development workflow.
What is AWS CodeCommit?
AWS CodeCommit is a secure and scalable managed source control service that provides Git-based version control for your code repositories. It eliminates the need for managing your version control infrastructure and allows you to focus on your software development.
Key Features and Benefits:
Fully Managed: CodeCommit takes care of the underlying infrastructure, ensuring high availability, scalability, and data durability.
Git-Compatible: CodeCommit supports Git commands, allowing you to use familiar workflows and collaborate seamlessly.
Secure and Private: CodeCommit encrypts your repositories and provides fine-grained access controls to protect your code.
Scalable and Reliable: CodeCommit handles repositories of any size and can easily scale to support your growing codebase.
Integration with AWS Services: CodeCommit integrates with other AWS services, such as AWS CodePipeline and AWS CodeBuild, for seamless CI/CD workflows.
Setting Up CodeCommit:
To get started with CodeCommit, follow these steps:
Set up an AWS account if you haven't already:
Visit the AWS website and create an account by providing the necessary details.
Follow the steps to set up your account and provide billing information.
Navigate to the AWS Management Console and search for "CodeCommit" to access the CodeCommit service:
Once logged in to the AWS Management Console, use the search bar to find the CodeCommit service.
Click on CodeCommit to access the service dashboard.
Create a repository and configure the repository settings:
Within the CodeCommit dashboard, click on "Create repository" to start creating a new repository.
Provide a meaningful name for your repository and an optional description to help identify its purpose.
Configure additional settings such as repository access permissions and branch settings as per your requirements.
Set up IAM users and permissions to control access to your repositories:
Access the AWS Identity and Access Management (IAM) service through the AWS Management Console.
Create IAM users or groups for individuals or teams who will be accessing the CodeCommit repositories.
Assign appropriate permissions to these IAM users or groups to control their access to repositories.
Ensure that permissions are set up following the principle of least privilege to maintain security.
Creating and Managing Repositories:
Once you have set up CodeCommit, you can create repositories and manage them efficiently:
Use the CodeCommit console or AWS CLI to create a new repository:
Within the CodeCommit dashboard, select "Create repository" and follow the prompts to create a new repository.
Alternatively, you can use the AWS Command Line Interface (CLI) to create repositories programmatically.
Clone the repository locally using Git commands:
Obtain the clone URL for the repository from the CodeCommit dashboard.
Open a terminal or command prompt and navigate to the desired directory.
Run the command:
git clone <clone-url>to create a local copy of the repository.
Commit changes to the repository using Git commands like git add and git commit:
Make changes to the files within the repository on your local machine.
Use the command:
git add <file(s)>to stage the changes for commit.Run
git commit -m "Commit message"to commit the changes to your local repository.
Push your changes to the remote CodeCommit repository using git push:
- Execute the command:
git push origin <branch-name>to push your committed changes to the remote repository on CodeCommit.
- Execute the command:
Collaborating with CodeCommit:
CodeCommit enables smooth collaboration among team members:
Invite team members to join your repository and grant them appropriate permissions:
Access the repository settings within the CodeCommit dashboard.
Use the "Access" or "Permissions" section to invite and manage users who can collaborate on the repository.
Assign permissions such as read, write, or admin access based on team member roles and responsibilities.
Use branches to isolate work and facilitate concurrent development:
Create branches within the repository to allow different team members to work on separate features or bug fixes concurrently.
Branches provide isolation and help prevent conflicts when merging changes later.
Merge branches and resolve conflicts using Git's merge and rebase functionality:
When work on a branch is complete, merge it back into the main branch (usually the "master" branch).
Use Git's merge or rebase commands to integrate changes from the branch into the main branch.
Resolve any conflicts that may arise during the merge process.
Leverage CodeCommit's pull request feature to review and discuss changes before merging:
When working on a branch, create a pull request within the CodeCommit dashboard.
Reviewers can provide feedback, comments, and suggestions directly within the pull request interface.
Once the changes are approved, they can be merged into the main branch.
Integrating CodeCommit with Git:
CodeCommit seamlessly integrates with Git, enabling you to leverage Git's rich feature set:
Configure Git credentials to authenticate with CodeCommit:
Generate Git credentials within the IAM service or use existing IAM user credentials.
Configure Git to use these credentials for authentication when interacting with CodeCommit repositories.
Set the CodeCommit repository as your Git remote using git remote add:
Retrieve the clone URL for the CodeCommit repository.
In your local Git repository, run the command:
git remote add origin <clone-url>to set the CodeCommit repository as the remote.
Use Git commands like git pull, git fetch, and git push to interact with your CodeCommit repository:
- Execute common Git commands to pull the latest changes, fetch updates, and push your local changes to CodeCommit.
CodeCommit Security and Access Control:
CodeCommit provides robust security features to protect your code:
Encrypt your repositories at rest using AWS Key Management Service (KMS):
- Configure KMS encryption for your CodeCommit repositories to encrypt data stored in the repositories.
Set up fine-grained access control using IAM policies, ensuring that only authorized users can access your repositories:
Define IAM policies to control access to your CodeCommit repositories based on user roles, groups, or individual users.
Specify the level of access (read, write, or admin) that each user or group has for specific repositories.
Use multi-factor authentication (MFA) to add an extra layer of security:
Enable MFA for IAM users accessing CodeCommit repositories.
Users will need to provide an additional authentication factor, such as a one-time password, along with their regular credentials.
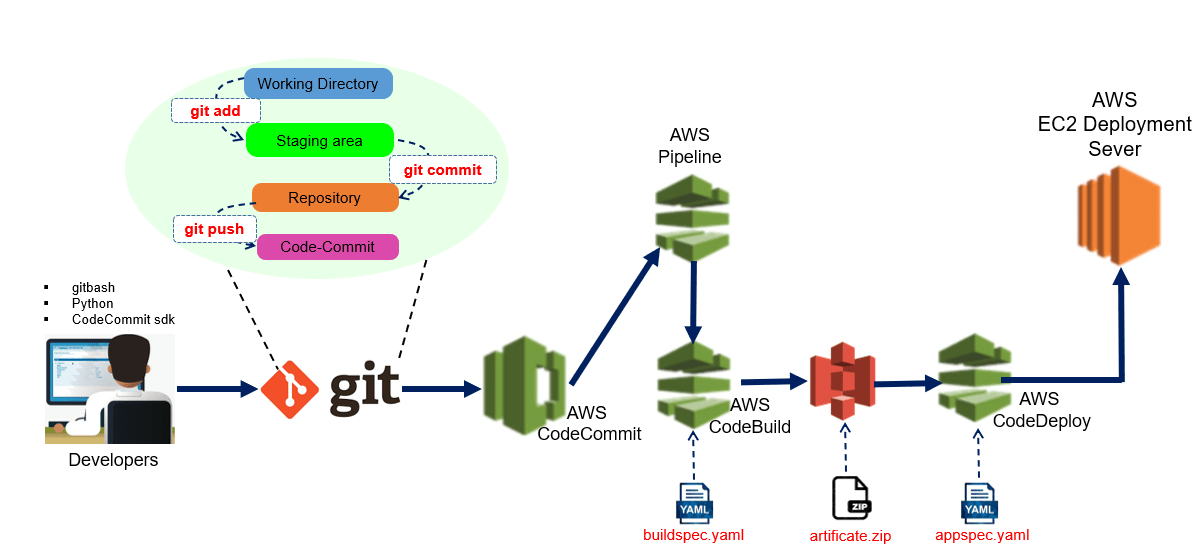
Continuous Integration with CodeCommit:
CodeCommit integrates seamlessly with other AWS services to enable continuous integration (CI) workflows:
Integrate CodeCommit with AWS CodePipeline to create automated CI/CD pipelines:
Set up a CodePipeline, which can be triggered by CodeCommit repository changes.
Configure CodePipeline to perform build, test, and deployment actions based on the changes detected in CodeCommit.
Use AWS CodeBuild to build and test your code whenever changes are pushed to CodeCommit:
- Configure CodeBuild to listen to CodeCommit events and automatically build and test your codebase upon changes.
Leverage AWS CodeDeploy to automate application deployments based on CodeCommit changes:
- Set up CodeDeploy to deploy your applications to AWS infrastructure automatically whenever CodeCommit repository changes occur.
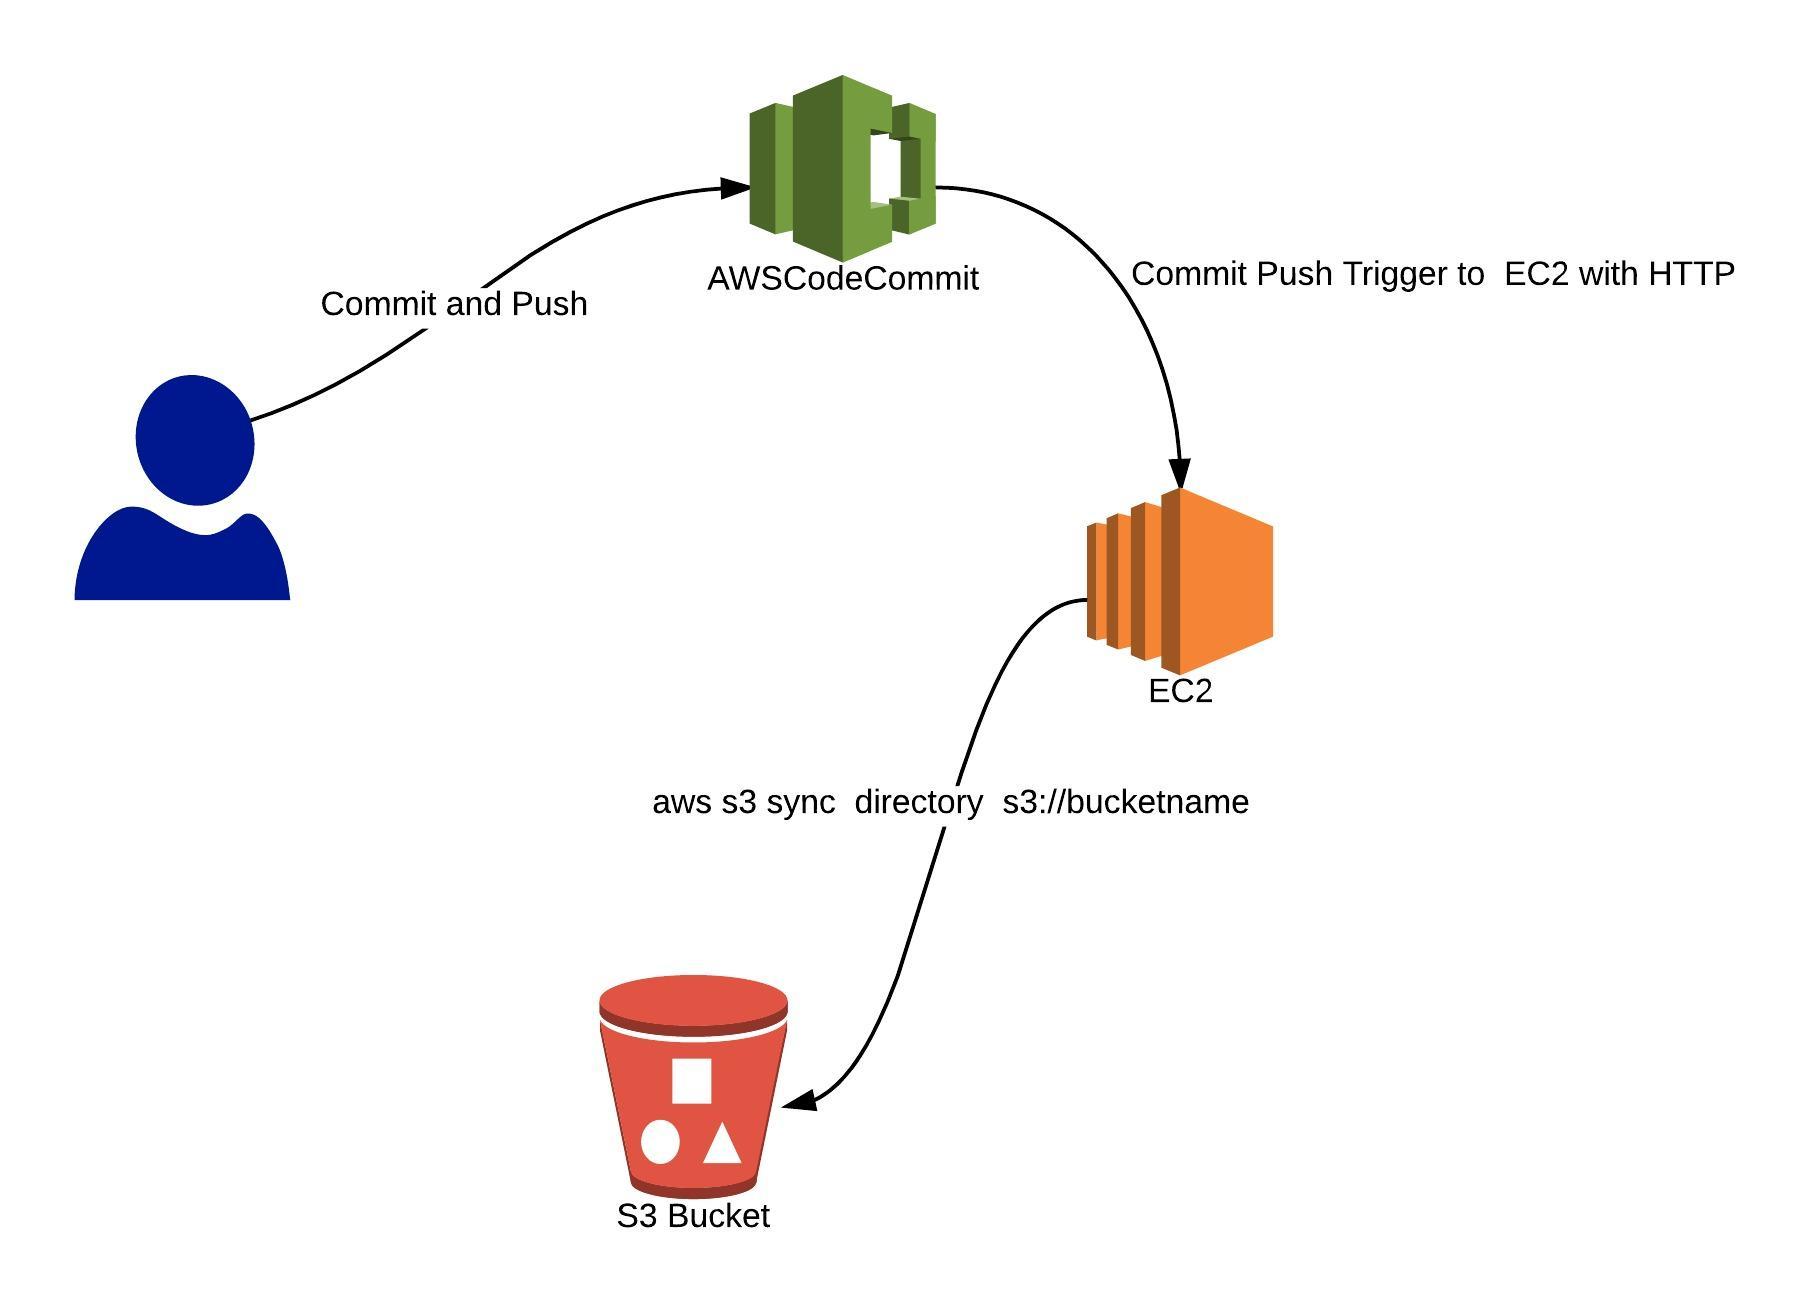
CodeCommit Notifications and Triggers:
CodeCommit provides notifications and triggers to enhance your development workflow:
Set up Amazon SNS or AWS Lambda to receive notifications for specific events, such as code pushes or pull requests:
Configure CodeCommit to send notifications to an Amazon SNS topic or trigger AWS Lambda functions.
Customize the notifications based on the events you want to be notified about.
Create event-driven workflows using CodeCommit triggers to perform actions like running tests or triggering deployments:
Use CodeCommit triggers to automate tasks based on specific events, such as running tests on code pushes or triggering deployments on branch merges.
Set up AWS Lambda functions or other services to perform the desired actions triggered by CodeCommit events.
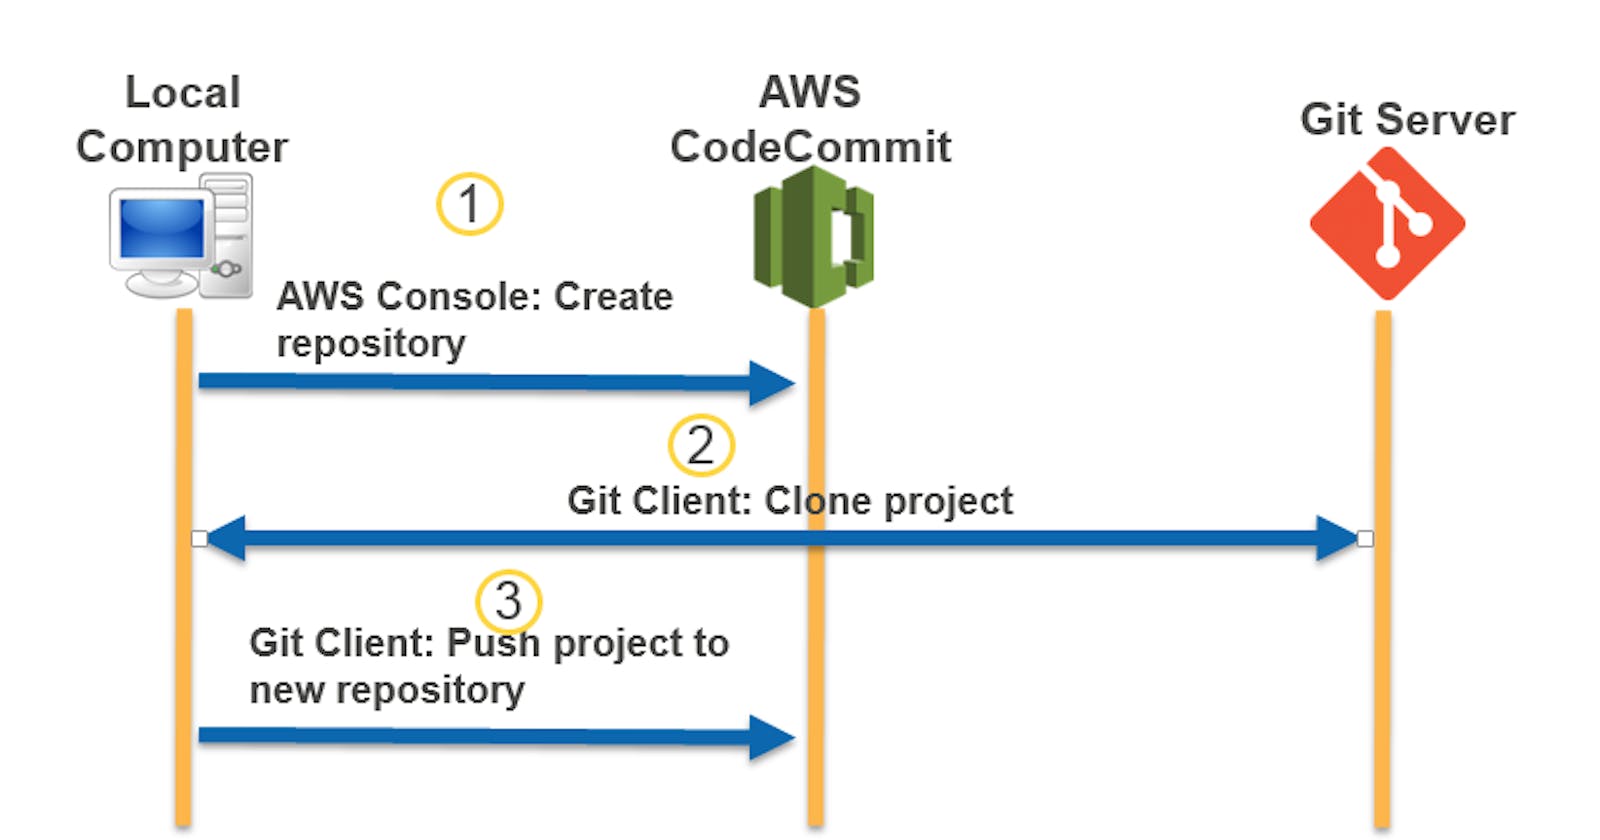
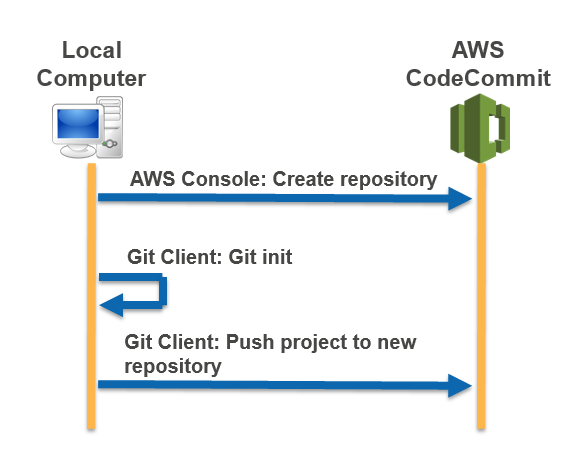
How does CodeCommit work?
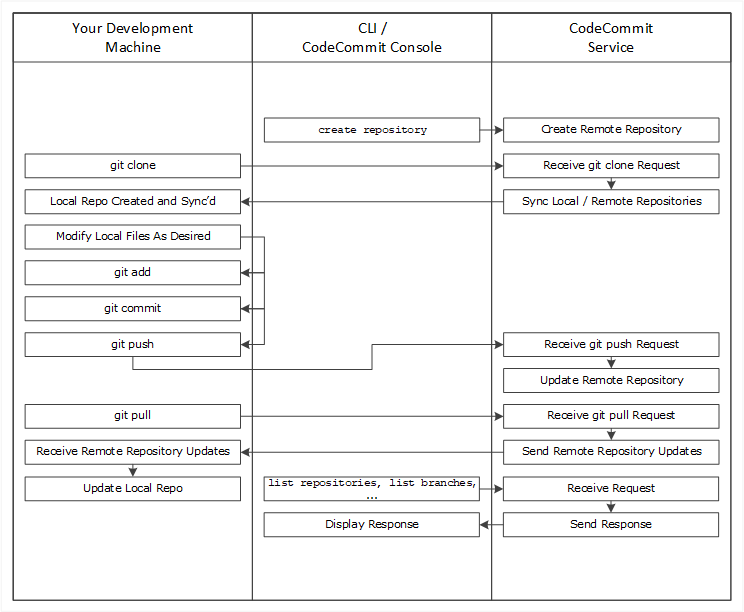
Use the AWS CLI or the CodeCommit console to create a CodeCommit repository.
From your development machine, use Git to run the git clone, specifying the name of the CodeCommit repository. This creates a local repo that connects to the CodeCommit repository.
Use the local repo on your development machine to modify (add, edit, and delete) files, and then run git add to stage the modified files locally. Run git commit to commit the files locally, and then run git push to send the files to the CodeCommit repository.
Download changes from other users. Run git pull to synchronize the files in the CodeCommit repository with your local repo. This ensures you're working with the latest version of the files.
Task 1: Set up a code repository on CodeCommit and clone it on your local.
Pre-requisites:
You should have an AWS account.
Install and configure the AWS Command Line Interface (CLI) on your local machine.
Step 1: Generate Git credentials
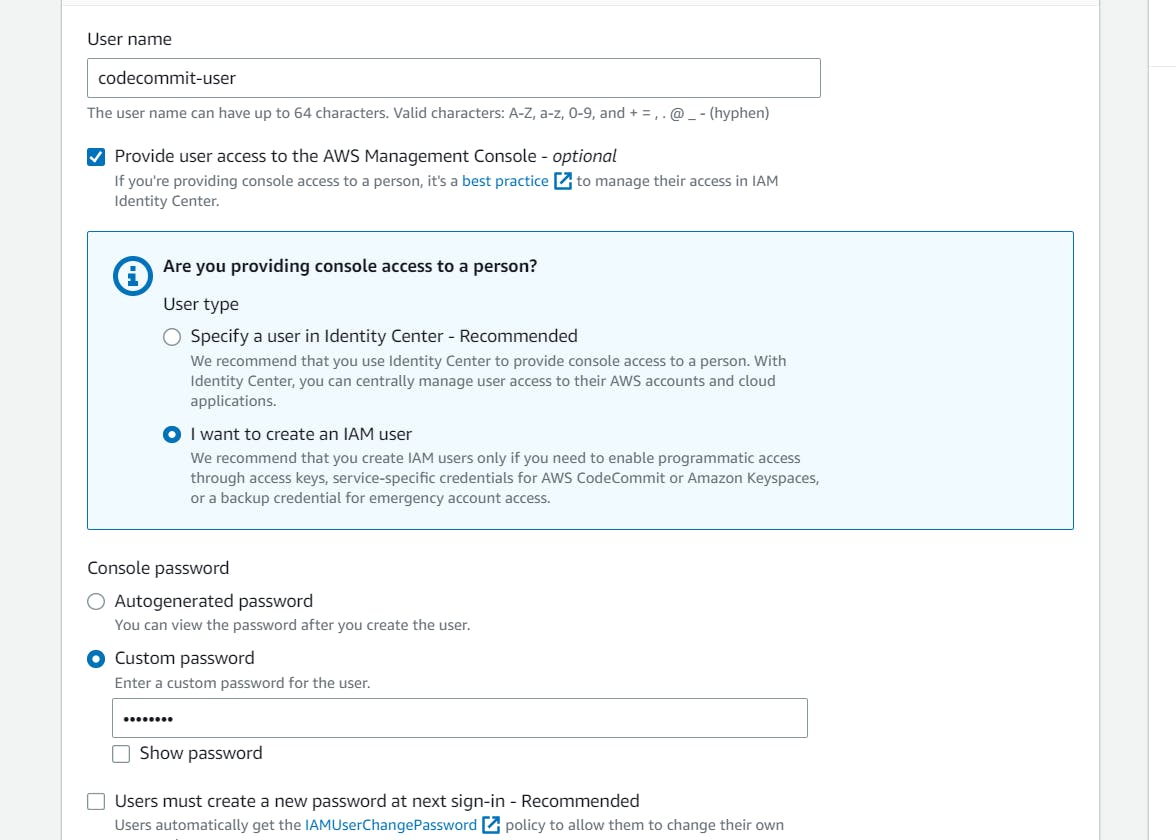
To get started with IAM Service, navigate to the dashboard and select "Users" from the left navigation pane. Now, create a new user by clicking on the "Create User" button. In the user creation process, you have the option to provide access to the AWS Management Console by checking the corresponding checkbox, which is optional.
Next, choose "I want to create an IAM user with a password" and proceed by clicking on the "Next" button. This step will take you to the configuration page for the new IAM user, where you can set the necessary permissions, access policies, and security settings to meet your requirements.
IAM (Identity and Access Management) is a crucial component of AWS, allowing you to control and manage user access to AWS resources securely. By following these simple steps, you can create new IAM users and customize their access levels to ensure a well-organized and secure AWS environment.
Next, let's proceed to the next step:
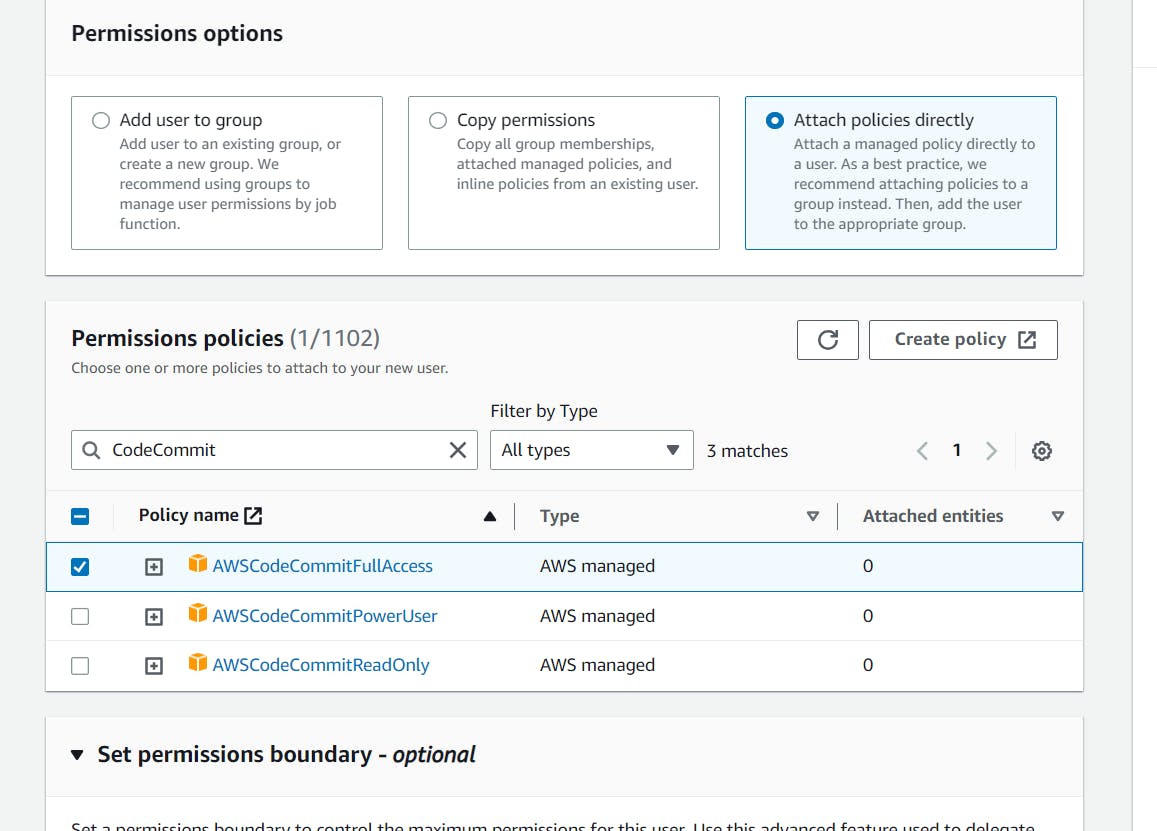
Click on "Attach Policies Directly" option.
From the list of available policies, select "AWSCodeCommitFullAccess."
After selecting the policy, click on the "Create User" button to create the user with the necessary permissions.
Download the .csv file since this is the only time you can view and download this password.
Step-by-Step Guide to Generate AWS CodeCommit HTTPS Git Credentials:
Open the AWS Management Console and log in to your account.
Navigate to the "IAM" (Identity and Access Management) service.
In the IAM dashboard, select "Users" from the left-hand sidebar.
Click on the user you created for CodeCommit access.
In the "Summary" tab of the user, locate and click on the "Security credentials" tab.
Scroll down to find the section titled "HTTPS Git credentials for AWS CodeCommit."
Click on the "Generate Credentials" button.
A pop-up window will appear, asking you to download the generated credentials. Click on the "Download" button.
Save the downloaded file securely, as it contains your Git credentials.
After downloading the credentials, click on the "Close" button to exit the pop-up window.
These are the Git credentials for accessing CodeCommit.
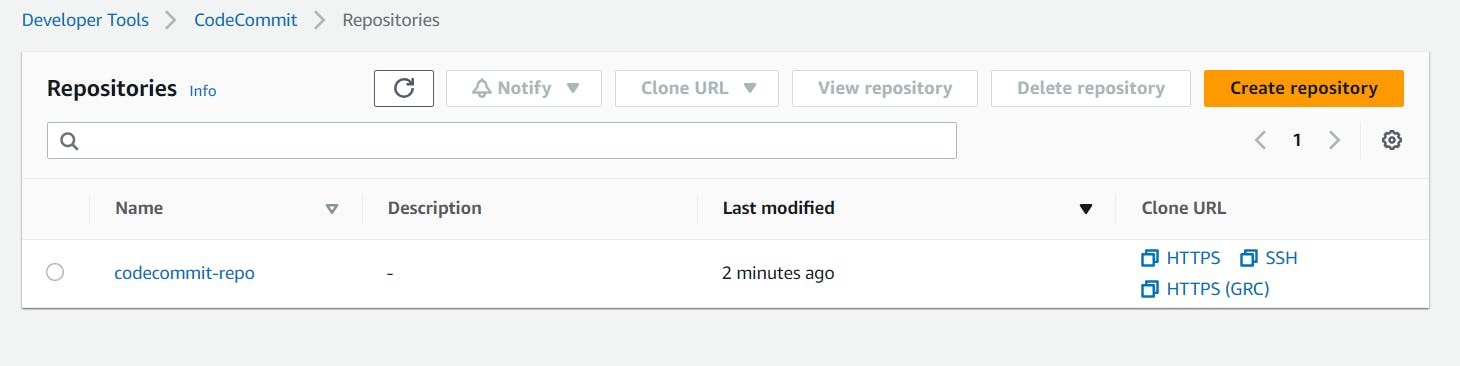
Step 2: Set up a code repository on CodeCommit.
Click on the CodeCommit service in your AWS console.
👉 Now, it's time to give your Repository a meaningful name that reflects your project.
👉 Once you've chosen a name, hit that "Create" button, and your repository will be ready to go! 🎉

Step 3: Clone repository from CodeCommit.
In the dashboard, click on HTTPS to copy the URL.
At your instance terminal:
#git clone <https>
git clone https://git-codecommit.ap-south-1.amazonaws.com/v1/repos/codecommit-repo

Go to the repository:

yay!!!!!
You just created an empty repository in AWS CodeCommit and cloned it.
Task 2: Add a new file from local and commit to your local branch. Push the local changes to the CodeCommit repository.
Step 1: Add a new file from local and commit to your local branch.
Create five files using:
touch file{01..05}.txt

Add these files to the staging area, using:
git status
git add .
git status
To add these to the local repositories history
git commit -m "Commiting the files I created now"

Step 2: Push the local changes to the CodeCommit repository
Using the following command, push the changes from your local to the CodeCommit repository.
git push origin master

Verify that the files are pushed into the CodeCommit repository.

Congo!!! You just pushed your local files to the CodeCommit Repository.
Conclusion:
AWS CodeCommit is a powerful and scalable version control service that provides secure and reliable hosting for Git repositories. By following the steps outlined in this blog, you can effectively set up CodeCommit, create and manage repositories, collaborate with team members, integrate with Git, and ensure code security through fine-grained access control. Additionally, CodeCommit seamlessly integrates with other AWS services like CodePipeline, CodeBuild, and CodeDeploy, enabling you to automate your CI/CD workflows. With features like notifications and triggers, CodeCommit enhances collaboration and enables event-driven actions to streamline your development process.
Start utilizing AWS CodeCommit today and experience the benefits of efficient version control and seamless integration within your software development projects.

To connect with me - https://www.linkedin.com/in/subhodey/