A Step-by-Step Guide to Installing Git and GitHub, and Creating Your First Repository
Table of contents
- <mark>Installing Git on Linux</mark>
- <mark>Installing Git on Ubuntu</mark>
- <mark>Installing Git on CentOS</mark>
- <mark>Account Creation on GitHub</mark>
- <mark>Basics of Git</mark>
- <mark>How it works, and how to use it to track changes to files</mark>
- <mark>Create a new repository on GitHub and clone it to your local machine</mark>
- <mark>Pushing Changes Back to the Repository on GitHub</mark>
Installing Git on Linux
The process of installing Git on Linux varies depending on the distribution you are using. Here are the steps for installing Git on Ubuntu and CentOS:
Installing Git on Ubuntu
Open Terminal on your Ubuntu machine.
Enter the following command to install Git:
 sudo apt-get update
 sudo apt-get install git
Once the installation is complete, type
git --versionin Terminal to verify that Git is installed correctly.
Installing Git on CentOS
Open Terminal on your CentOS machine.
Enter the following command to install Git:
yum install gitOnce the installation is complete, type
git --versionin the Terminal to verify that Git is installed correctly.
Account Creation on GitHub
Step 1: Go to GitHub's Website
- Open a web browser and go to the GitHub website at github.com.
Step 2: Sign Up for a GitHub Account
Click on the "Sign up" button on the top-right corner of the GitHub website.
Choose a username, enter your email address, and create a password.
Click on the "Verify" button and follow the instructions to verify your email address.
Complete the sign-up process by providing additional information, such as your name and profile picture, if desired.
Click on the "Create account" button to create your GitHub account.
Basics of Git
Step 1: Clone Your GitHub Pages Repository
Go to the repository page of your GitHub Pages that you created in the previous step.
Click on the "Code" button and copy the URL of your repository.
Open a command-line interface (such as Git Bash on Windows or Terminal on macOS/Linux) on your local computer.
Navigate to the directory where you want to clone your repository using the "cd" command.
Clone your repository by running the following command, replacing <repository-url> with the URL of your repository:
git clone <repository-url>
This will create a local copy of your GitHub Pages repository on your computer.
Now that you have Git installed and your repository cloned, you can start learning the basics of Git.
Some common Git commands you may need to use are:
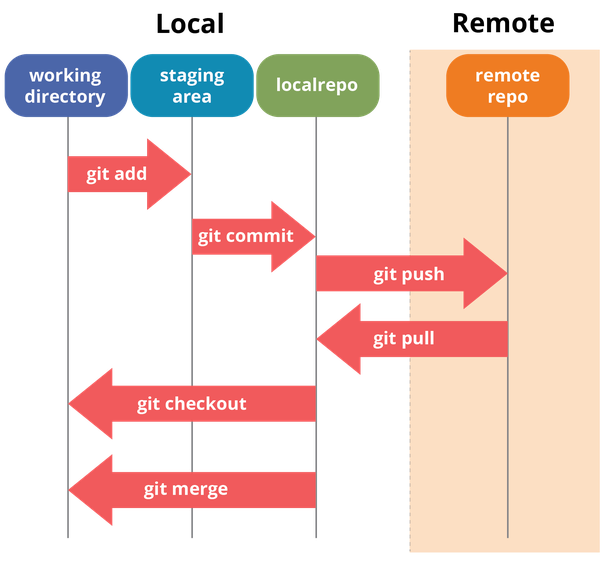
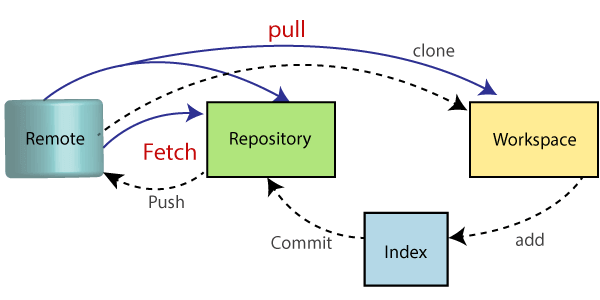
git add: Adds changes to the staging area, preparing them for a commit.git commit: Creates a new commit with the changes in the staging area.git push: Pushes your local commits to the remote repository on GitHub.git pull: Fetches and merges change from the remote repository to your local repository.git status: This shows the status of your local repository, including any changes that need to be committed or pushed.git log: Displays a log of all the commits in the repository.
You can learn more about these and other Git commands in the official Git documentation or through online tutorials and resources.

How it works, and how to use it to track changes to files
Git Repository: A Git repository is a directory on your local computer that contains your project files and version history. You can create a Git repository using the
git initcommand, which initializes a new Git repository in the current directory.Commits: In Git, changes to files are captured in commits. A commit is a snapshot of the changes made to files at a specific point in time. You can create a commit using the
git commitcommand, which takes a snapshot of the changes you have made to the files in your repository and adds it to the version history.Branches: Git allows you to create multiple branches in your repository, which are independent lines of development. You can create a new branch using the
git branchcommand, and switch to a different branch using thegit checkoutcommand. Branches are useful for working on different features or bug fixes in parallel, and they can be merged back into the main branch (usually called the "master" or "main" branch) when the changes are ready.Working Directory and Staging Area: Git has a working directory and a staging area. The working directory is where you make changes to your files, and the staging area is where you stage the changes before committing them. You can stage changes using the
git addcommand, which adds the changes in the working directory to the staging area, and then creates a commit using thegit commitcommand to capture the changes in a commit.Tracking Changes: Git tracks changes to files based on the differences (or "diffs") between the files in the working directory and the files in the latest commit. You can view the differences between the working directory and the latest commit using the
git diffcommand, which shows the changes that have been made but not yet staged. Once you have staged the changes, you can use thegit diff --stagedcommand to view the differences between the staging area and the latest commit.Commit History: Git keeps track of all the commits in the repository, creating a commit history that shows the changes made to files over time. You can view the commit history using the
git logcommand, which displays a list of all the commits in the repository, along with their commit messages, timestamps, and other information.Collaborating with Others: Git allows you to collaborate with others by sharing your repository and working on the same project together. You can push your local commits to a remote repository (such as GitHub or GitLab) using the
git pushcommand, and you can pull changes from a remote repository using thegit pullcommand. Git also provides features for resolving conflicts that may arise when multiple people make changes to the same file at the same time.
These are the basic concepts of how Git works and how to use it to track changes to files in a repository. With Git, you can effectively manage changes to your project, collaborate with others, and maintain a version history of your files, making it a powerful tool for software development and other collaborative projects.
Create a new repository on GitHub and clone it to your local machine
After getting logged to your account :
Step 1: Clone the Repository to Your Local Machine
Open a terminal window on your local machine.
Navigate to the directory where you want to clone the repository. You can use the
cdcommand to change directories.On your GitHub repository page, click on the "Code" button and copy the URL of the repository.
In the terminal, use the
git clonecommand followed by the repository URL to clone the repository to your local machine. For example:
git clone https://github.com/YourUsername/YourRepository.git
Replace "Yourusername" with your GitHub username and "YourRepository" with the name of your repository.
Step 3: Set Up Remote Tracking and Collaborate
After cloning the repository, navigate to the cloned directory using the
cdcommand in the terminal.You now have a local copy of the repository on your machine. You can make changes to the files in this directory as needed.
Once you have made changes, you can use Git commands as
git add,git commit, andgit pushto the stage and commit your changes to the repository on GitHub.You can also pull changes from others by using the
git pullcommand. This will fetch the latest changes from the remote repository and merge them into your local branch.Collaborators can also push changes to the repository on GitHub, and you can pull those changes to your local repository using the
git pullcommand.You can also create branches, switch between branches, and merge branches using Git commands to collaborate with others on different features or bug fixes.

Pushing Changes Back to the Repository on GitHub
Step 1: Make Changes to Files Locally The first step is to make changes to the files in your local repository. This can include adding, modifying, or deleting files, depending on the updates you want to make. You can use your preferred code editor or command-line interface to make these changes.
Step 2: Stage the Changes After making changes, you need to stage them before committing. Staging is the process of selecting specific changes to include in the next commit. You can stage changes using the git add command followed by the file name or using git add . to stage all changes in the working directory.
Example:
$ git add file1.txt # Stage changes in file1.txt
Step 3: Commit the Changes Once you have staged the changes, you need to commit them to create a snapshot of the changes in the repository. A commit requires a commit message that describes the changes made in the commit. You can use the git commit command along with the -m flag followed by the commit message to create a commit.
Example:
$ git commit -m "Update file1.txt with new content" # Create a commit with a commit message
Step 4: Push the Changes to GitHub After committing the changes locally, you need to push the changes to the GitHub repository to make them available in the remote repository. You can use the git push command followed by the name of the remote repository and the branch you want to push the changes to.
Example:
$ git push origin main # Push changes to the 'main' branch of the remote repository named 'origin'
Note: 'Origin' is the default name given to the remote repository when you clone a repository from GitHub. If you have named your remote repository differently, you need to use that name instead of 'origin'.
Step 5: Verify the Changes on GitHub Once the changes are pushed to the remote repository on GitHub, you can verify them by navigating to the repository on GitHub's website. You should see the changes reflected in the repository's file listing or commit history. You can also review the commit message and changes made in the commit to ensure that they match your intentions.
Conclusion: In this step-by-step guide, we covered the process of installing Git and GitHub, creating a GitHub account, and creating your first repository. We discussed how Git is a powerful version control system that allows you to track changes to files and collaborate with others, while GitHub provides a web-based hosting service for Git repositories that enables easy sharing and collaboration.
We started by installing Git on your computer and configuring your Git settings, including setting up your username and email address. Then, we created a GitHub account and generated a new repository to serve as a remote repository for your local Git repository. We learned how to initialize a local Git repository, add files to the repository, commit changes with meaningful commit messages, and push the changes to the remote repository on GitHub.
By following this step-by-step guide, you now have a basic understanding of how to install Git and GitHub, create repositories, commit changes, and collaborate with others using Git and GitHub. With this foundation, you are well-equipped to start using Git and GitHub for version control and collaboration in your software development projects. Happy coding!


