Understanding Jenkins: A Comprehensive Guide to Installing Jenkins and Creating a Freestyle Pipeline
Introduction:
Jenkins, an open-source automation server, has become a pivotal tool in the realm of continuous integration and continuous deployment (CI/CD). With its extensive plugin ecosystem and robust capabilities, Jenkins empowers software development teams to automate their build, test, and deployment processes, leading to increased efficiency and faster software delivery. In this article, we will explore the installation process of Jenkins and gain a deeper understanding of its fundamental concepts.
Section 1:
Installation To embark on our journey with Jenkins, we first need to install it on our system. Follow these steps:
Step 1: Prerequisites Ensure that Java Development Kit (JDK) is installed on your machine, as Jenkins is built on Java. You can download the latest JDK version from the Oracle website.
Step 2: Jenkins Installation
Visit the Jenkins official website (jenkins.io) and navigate to the Downloads page.
Choose the appropriate installation package for your operating system (Windows, macOS, Linux, etc.).
Download the installer file and run it to start the installation process.
Follow the on-screen instructions, selecting the desired configuration options, such as the installation directory and initial administrator password.
Once the installation is complete, Jenkins will start running as a service.
Section 2:
Getting Started with Jenkins Now that Jenkins is up and running, let's delve into its key concepts and features.
Jenkins Dashboard: Upon accessing Jenkins through a web browser, you will be greeted by the Jenkins dashboard. This user-friendly interface serves as the central hub for managing Jenkins and its functionalities.
Jobs and Builds: In Jenkins, a job represents a task or a set of tasks to be executed, such as compiling code, running tests, or deploying applications. Each job consists of one or more builds, which are individual executions of the job. Jenkins keeps a historical record of builds, enabling you to track changes and troubleshoot issues.
Plugins: One of Jenkins' greatest strengths is its vast plugin ecosystem. Plugins extend Jenkins' functionality, allowing integration with various tools and technologies. You can browse and install plugins directly from the Jenkins dashboard, enabling customization based on your specific requirements.
Build Triggers: Jenkins offers multiple ways to trigger builds automatically, such as time-based scheduling, code repository changes (e.g., Git commits), or remote API calls. Configuring appropriate build triggers ensures that your jobs execute at the desired intervals or in response to specific events.
Build Steps: Build steps define the actions that Jenkins should perform during the execution of a job. These steps can include shell commands, script executions, or invoking external tools. Jenkins provides a flexible and customizable environment to accommodate different build requirements.
Build Artifacts: During the build process, Jenkins produces artefacts, which are the generated outputs, such as compiled binaries, test reports, or deployment packages. Artefacts are crucial for traceability and downstream processes, enabling you to easily access and distribute the outputs of a build.
Section 3:
Continuous Integration with Jenkins One of Jenkins' primary use cases is implementing continuous integration, ensuring that changes made by multiple developers are integrated smoothly and tested regularly. Here's a typical CI workflow using Jenkins:
Version Control Integration: Integrate Jenkins with your version control system (e.g., Git, Subversion) to automatically trigger builds whenever changes are committed to the repository. Jenkins can pull the latest code, build it, and execute tests.
Build and Test Automation: Leverage Jenkins to automate the build process, including dependency management, compilation, and packaging. Integrate testing frameworks to execute unit tests, integration tests, and any other required testing activities.
Code Quality Analysis: Utilize plugins and tools integrated with Jenkins to perform static code analysis, code coverage analysis, and other quality checks. This helps maintain code standards and identify potential issues early in the development process.
Continuous Deployment: Extend Jenkins' capabilities by integrating it with deployment tools, cloud platforms (e.g., AWS, Azure), or containerization technologies (e.g., Docker, Kubernetes). This allows for the automated deployment of tested and approved builds to various environments.
Create a freestyle pipeline to print "Hello World!!
1. What is a Jenkins Freestyle Project?
Jenkins Freestyle Project is a repeatable build job, script, or pipeline that contains steps and post-build actions. It is an improved job or task that can span multiple operations. It allows you to configure build triggers and offers project-based security for your Jenkins project. It also offers plugins to help you build steps and post-build actions. The types of actions you can perform in a Jenkins build step or post-build action are quite limited. There are many standard plugins available within a Jenkins Freestyle Project to help you overcome this problem. How to Create a New Build Job in Jenkins The freestyle build job is a highly flexible and easy-to-use option. You can use it for any type of project; it is easy to set up, and many of its options appear in other build jobs. Below is a step-by-step process to create job in Jenkins.
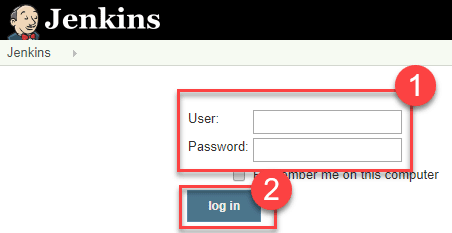
Step 1) Log in to Jenkins To create a Jenkins freestyle job, log on to your Jenkins dashboard by visiting your Jenkins installation path. Usually, it will be hosted on localhost at http://localhost:8080 If you have installed Jenkins in another path, use the appropriate URL to access your dashboard as shown in the below Jenkins job creation example.
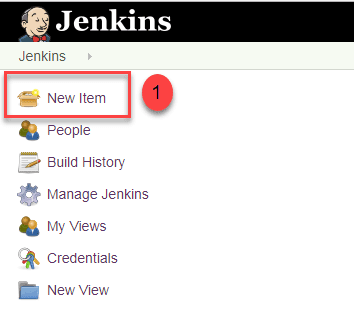
Step 2) Create a New Item Click on “New Item” at the top left-hand side of your dashboard.
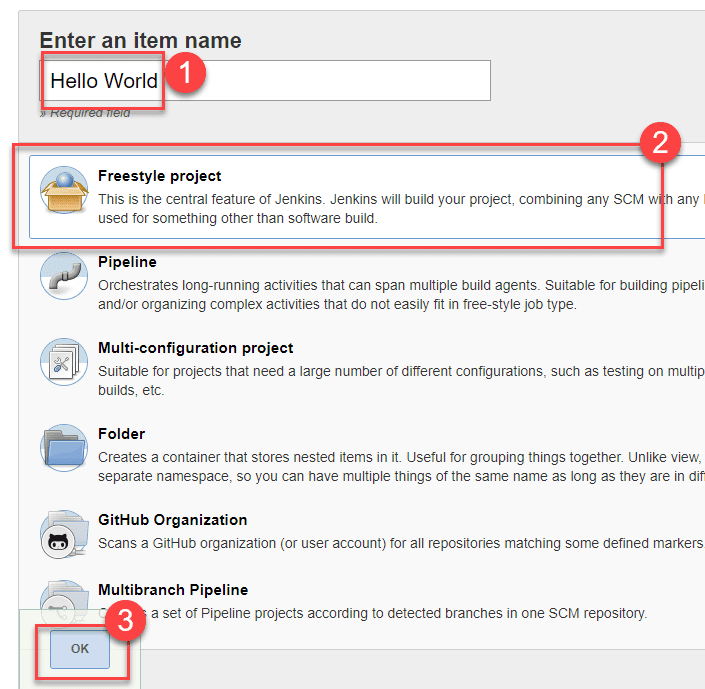
Step 3) Enter Item details In the next screen, Enter the name of the item you want to create. We shall use the “Hello world” for this demo. Select Freestyle project Click Okay.
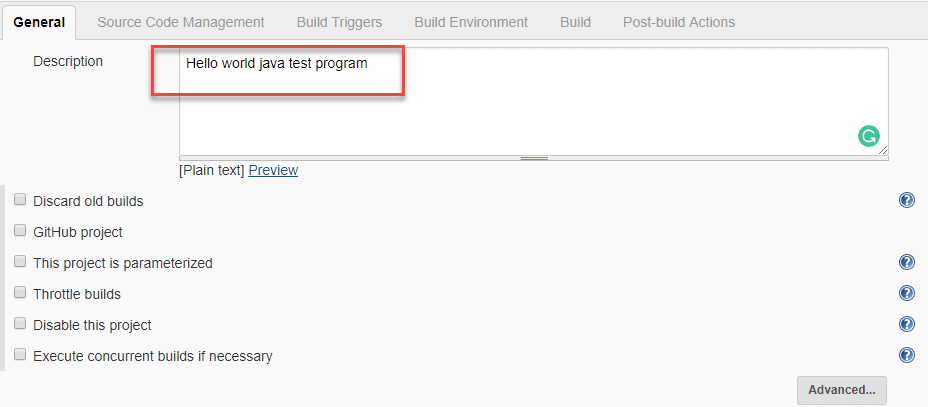
Step 4) Enter Project details Enter the details of the project you want to test. Step 5) Enter repository URL Under Source Code Management, Enter your repository URL. We have a test repository located at anything you want. It is also possible for you to use a local repository. If your GitHub repository is private, Jenkins will first validate your login credentials with GitHub and only then pull the source code from your GitHub repository.
Step 6) Tweak the settings Now that you have provided all the details, it’s time to build the code. Tweak the settings under the build section to build the code at the time you want. You can even schedule the build to happen periodically, at set times. Under build,
1. Click on “Add build step”

2. Click on “Execute Windows batch command” and add the commands you want to execute during the build process.
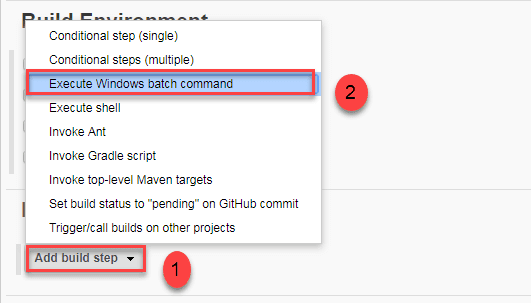
Here, I have added the Java commands to compile the Java code. I have added the following Windows commands: javac HelloWorld.java java HelloWorld.
Step 7) Save the project When you have entered all the data, Click Apply to Save the project.
Step 8) Build Source code Now, in the main screen, Click the Build Now button on the left-hand side to build the source code.
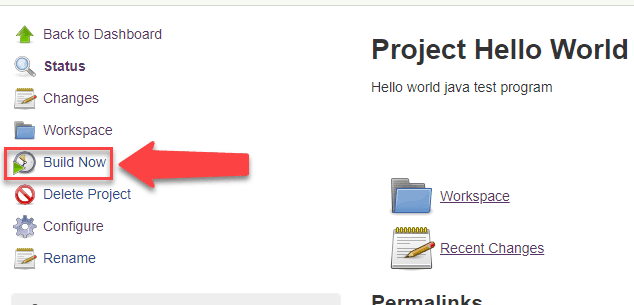
Step 9) Check the status After clicking on Build Now, you can see the status of the build you run under Build History.
Step 10) See the console output Click on the build number and then Click on the console output to see the status of the build you run. It should show you a success message, provided you have followed the setup properly as shown in the below Jenkins create new job example. In sum, we have executed a HelloWorld program hosted on GitHub. Jenkin pulls the code from the remote repository and builds continuously at a frequency you define.
Summary: Jenkins Freestyle Project is a repeatable build job, script, or pipeline that contains steps and post-build actions. It is an improved job or task that can span multiple operations. The types of actions you can perform in a build step or post-build action are quite limited. There are many standard plugins available within a Jenkins Freestyle Project to help you overcome this problem. Freestyle build Jenkins jobs are highly flexible and easy to use.
You can use it for any type of project; it is easy to set up, and many of its options appear in other build Jenkins jobs. If your GitHub repository is private, Jenkins will first validate your login credentials with GitHub and only then pull the source code from your GitHub repository.

To connect with me - https://www.linkedin.com/in/subhodey/

