


Git Stash: Saving Changes for Later
In Git, the stash command allows you to temporarily save changes in a new stash, which acts like a temporary branch that you can switch to and from. You can stash changes that you have made but do not want to commit yet, or changes that you want to transfer to another branch later. This can be helpful in situations where you're in the middle of working on a feature branch and need to switch to a different branch to fix a bug or work on a different feature, without committing incomplete changes.
To use Git Stash, you can follow these steps:
- Make sure you're in the branch where you want to save your changes.
$ git checkout my-feature-branch
- Use the stash command followed by a name for your stash. For example:
$ git stash save "WIP: Work in progress"
This will save your changes in a new stash with the given name, which helps you identify the stash later.
Git will create a new stash and revert your working directory to the most recent commit, leaving you with a clean working directory to switch to a different branch or perform other Git operations.
After you've completed the necessary work on the other branch or performed the required Git operations, you can switch back to your original branch and retrieve the stash using the git stash apply command:
$ git checkout another-branch
# ... do some work ...
$ git checkout my-feature-branch
$ git stash apply stash@{0}
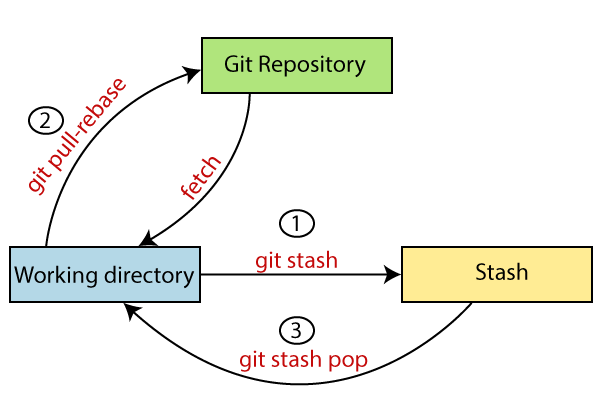
This will retrieve the stash and apply the changes back to your working directory, allowing you to continue working on your original branch where you left off.
- Finally, you can commit the changes when they're ready using the git commit command:
$ git add .
$ git commit -m "Completed feature XYZ"
Note that you can also use other stash-related commands, such as git stash drop to remove a stash without applying the changes, or git stash list to see a list of all stashes.
Cherry-pick:
Cherry-picking is a common term used in software development, referring to the act of selecting and applying only specific changes from a source code repository to another branch or repository. It allows developers to choose and apply changes selectively, rather than merging an entire branch and is typically used to incorporate specific changes or bug fixes into a different branch without bringing in unrelated code.
Here's an example of how cherry-picking works in a Git version control system, which is a popular tool used in software development:
Let's say there are two branches in a Git repository: master and feature. The feature branch contains several commits with different changes, but you only want to apply one specific change to the master branch. You can use the following Git command to cherry-pick that particular commit:
git checkout master
git cherry-pick <commit-hash>
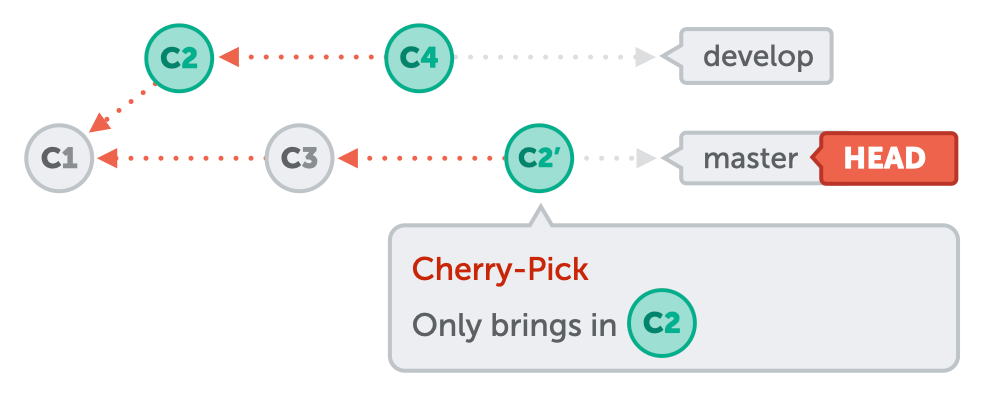
In the above command, <commit-hash> is the unique identifier of the commit you want to cherry-pick from the feature branch. Git will apply only that specific commit's changes to the master branch, leaving out other commits that are not relevant.
Resolving conflicts :
Resolving conflicts in Git and GitHub is a critical skill for software development teams working collaboratively on the same codebase. Git, a distributed version control system, and GitHub, a popular web-based hosting service for Git repositories, provide robust tools for managing and resolving conflicts that may arise when multiple developers are making changes to the same files simultaneously.
The first step in resolving conflicts in Git and GitHub is to identify the conflicting changes. This can be done using Git commands such as git status and git diff, which shows the differences between the local branch and the remote branch. Conflicts are usually indicated with markers in the code, such as "<<<<<<<", "=======", and ">>>>>>>", highlighting the conflicting changes made by different developers.

Once the conflicts are identified, the next step is to choose the appropriate approach for resolution. Git and GitHub provide different options, such as merging or rebasing the changes, depending on the situation. Merging combines the changes from different branches, while rebasing moves the changes of one branch on top of another. Both approaches have their pros and cons, and the choice depends on the specific requirements and workflow of the project.
After choosing the resolution approach, the conflicts need to be manually resolved by editing the affected files. This involves carefully reviewing the changes made by different developers, understanding their intentions, and finding a way to combine them harmoniously. It's essential to communicate with the other developers involved, discussing and clarifying any ambiguities or disagreements to ensure a cohesive resolution.
Once the conflicts are resolved, the changes need to be staged and committed using Git commands, such as git add and git commit. It's important to provide clear and meaningful commit messages that describe the resolution and the reasoning behind it. Finally, the changes can be pushed to the remote repository on GitHub using git push, making them available to other team members.
TASK 1:
- Create a new branch and switch to it:
git checkout -b my-feature-branch
This creates a new branch called my-feature-branch and switches to it.
Make some changes to the files in your working directory.
Use
git stashto save the changes without committing them:This temporarily saves the changes you made in a new stash.
Switch to a different branch, for example, the
mainbranch:
git checkout main
This switches to the main branch.
- Make some changes to the files in your working directory, and commit them:
git add .
git commit -m "Committing changes to main branch"
This adds and commits the changes you made on the main branch.
- Switch back to the original branch,
my-feature-branch:
git checkout my-feature-branch
This switches back to the my-feature-branch branch.
- Use
git stash popto bring the changes back and apply them on top of the new commits:
git stash pop
This retrieves the changes from the stash you created earlier and applies them on top of the new commits you made on the main branch.
Note: If there are any conflicts between the changes in the stash and the changes in the main branch, Git will prompt you to resolve them manually before the stash can be applied successfully.
- Finally, you can review and modify the changes as needed, and then commit them:
git add .
git commit -m "Applying changes from stash"
This adds and commits the changes from the stash to the my-feature-branch.
Using git stash and git stash pop can be helpful when you need to temporarily save changes without committing them, switch between branches, and then bring the changes back and apply them on top of new commits. It's a useful tool for managing changes in a Git workflow and resolving conflicts effectively.
TASK-02
Open
version01.txtin your preferred text editor.Add the following lines after the "This is the bug fix in the development branch" that was added on Day10 and reverted to this commit:
Line2>> After bug fixing, this is the new feature with minor alteration”
Save the changes and exit the text editor.
Stage and commit the changes with the commit message "Added feature2.1 in development branch":
git add version01.txt
git commit -m "Added feature2.1 in development branch"
- Add the next set of lines to
version01.txt:
Line3>> This is the advancement of the previous feature
- Stage and commit the changes with the commit message "Added feature2.2 in development branch":
git add version01.txt
git commit -m "Added feature2.2 in development branch"
- Add the final set of lines to
version01.txt:
Line4>> Feature 2 is completed and ready for release
- Stage and commit the changes with the commit message "Feature2 completed":
git add version01.txt
git commit -m "Feature2 completed"
- Switch to the
productionbranch:
git checkout production
- Perform a
git rebaseto incorporate the changes from thedevelopmentbranch:
git rebase development
Resolve any conflicts, if any, during the rebase process.
After the rebase is complete, review the changes in
version01.txtto ensure they are correctly reflected in theproductionbranch.Stage and commit the changes in the
productionbranch with appropriate commit messages to reflect the changes from thedevelopmentbranch:
git add version01.txt
git commit -m "Added feature2.1 from development branch"
Repeat the above steps for the other two commits made in the development branch as well.
By using git rebase, the changes made in the development branch will be incorporated into the production branch and the commit messages will also be reflected, providing a clean and organized commit history in both branches. Remember to always carefully review and test the changes before merging them into production to ensure the stability and quality of the codebase.
TASK-03
Assuming you are currently on the production branch, follow these steps:
- Cherry-pick the "Added feature2.2 in development branch" commit from the
developmentbranch:
git cherry-pick <commit-hash>
Replace <commit-hash> with the commit hash of the "Added feature2.2 in development branch" commit.
Open
version01.txtin your preferred text editor.Add the following line after "This is the advancement of the previous feature":
Line4>> Added few more changes to make it more optimized.
Save the changes and exit the text editor.
Stage and commit the changes with the commit message "Optimized the feature":
git add version01.txt
git commit -m "Optimized the feature"
By cherry-picking the "Added feature2.2 in development branch" commit and adding additional changes to it, you have now incorporated the latest changes from the development branch into the production branch and made additional optimizations. This approach can be useful when you need to selectively incorporate changes from one branch into another while retaining the commit history and messages.
