Complete Step-by-Step Guide: Setting up Ansible for Seamless EC2 Instance Management on AWS
Table of contents
- Introduction:
- Step 1: Launching an EC2 Instance
- Step 2: Securely Connect via SSH
- Step 3: Installing Ansible
- Step 4: Verifying Ansible Installation
- Step 5: Launching Additional EC2 Instances
- Step 6: Managing SSH Authentication
- Step 7: Creating Ansible Inventory File
- Step 8: Executing a Ping Command
- Step 9: Harnessing Ansible's Power
- Conclusion:
Introduction:
Welcome to our comprehensive guide that will take you through the entire process of setting up Ansible and mastering EC2 instance management on AWS. In today's fast-paced DevOps landscape, automation is key to streamlining infrastructure management and boosting productivity. With Ansible's powerful capabilities, you can achieve seamless orchestration of your cloud resources.
Step 1: Launching an EC2 Instance
To get started, head over to your AWS console and create a new EC2 instance. Follow the step-by-step configuration process, where you can select the instance type, security settings, and more, tailoring it to your specific requirements. Once your instance is up and running, take note of the provided private key - this will ensure secure access to your EC2 instance.

Step 2: Securely Connect via SSH
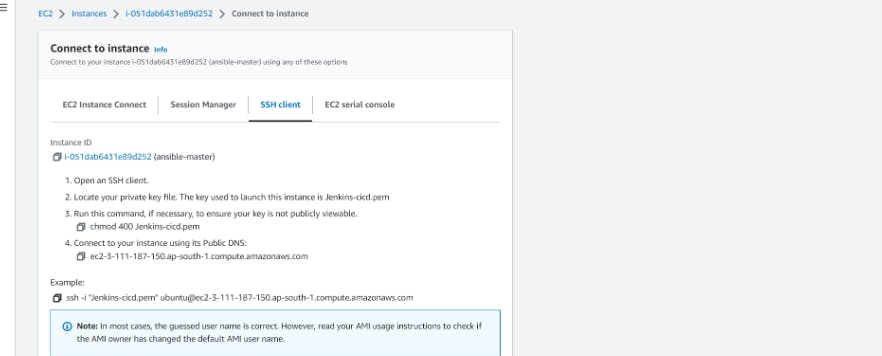
Now that your EC2 instance is launched, it's time to establish a secure connection to it using SSH. Use the provided private key to authenticate and gain remote access to your instance. SSH ensures that your communication is encrypted, guaranteeing a high level of security.

Step 3: Installing Ansible
Ansible is a powerful automation tool, and installing it is a breeze. We'll guide you through the process of adding the Ansible PPA repository, updating the package list, and finally installing Ansible on your EC2 instance. Once installed, you'll have a whole new world of automation at your fingertips.
sudo apt-add-repository ppa:ansible/ansible
sudo apt update
sudo apt install ansible

Step 4: Verifying Ansible Installation
After installation, it's essential to verify that Ansible is up and running as expected. We'll show you how to check the version of Ansible to ensure that everything is set up correctly. This step will give you confidence in the setup, setting the stage for smooth automation.

Step 5: Launching Additional EC2 Instances
To expand your infrastructure, you'll launch two new EC2 instances. These instances will be managed by your ansible master, leveraging the same private key for secure access. This approach simplifies management and enables uniformity across instances.

Step 6: Managing SSH Authentication
A smooth connection is vital for successful communication between Ansible and the remote hosts. In this step, we'll address any SSH authentication issues that may arise, ensuring a secure and uninterrupted connection.
- SSH into ansible-server1 and other instances
sudo ssh -i /key-path ubuntu@public-ip-address
Step 7: Creating Ansible Inventory File
To efficiently manage your EC2 instances, it's essential to create an inventory file for Ansible. This file will contain a list of the IP addresses of all your servers, allowing Ansible to target and manage each instance effectively.
verify the inventory of hosts using the ansible-inventory command.
ansible-inventory --list -y -i <inventory-file-path>

Avoiding the error after ping request give the required permissions :

Step 8: Executing a Ping Command
With everything set up, it's time to put Ansible to the test. We'll guide you through executing a ping command to confirm that Ansible can communicate with the remote hosts. This verification step ensures that your automation is functioning correctly.
ansible all-m ping -i -i <directory path>
Step 9: Harnessing Ansible's Power
Now that your EC2 instances are successfully managed by Ansible, it's time to delve deeper into its capabilities. Explore ad hoc commands to check free memory, uptime, and other crucial metrics. This will provide you with invaluable insights into your infrastructure's health and performance.
Conclusion:
Congratulations! You've completed the step-by-step guide to setting up Ansible for seamless EC2 instance management on AWS. By harnessing the power of Ansible's automation, you've unlocked a world of efficiency and scalability in your DevOps workflows. As you continue to explore and implement Ansible in your projects, you'll find that automation is the key to unleashing your team's full potential. Happy automating!

Follow for more:

